"Steppin' Out" - How It Was Created !
Software Used:
Lightroom 4
Photoshop CS 5 Extended
Subject |
Explosion |
Background |
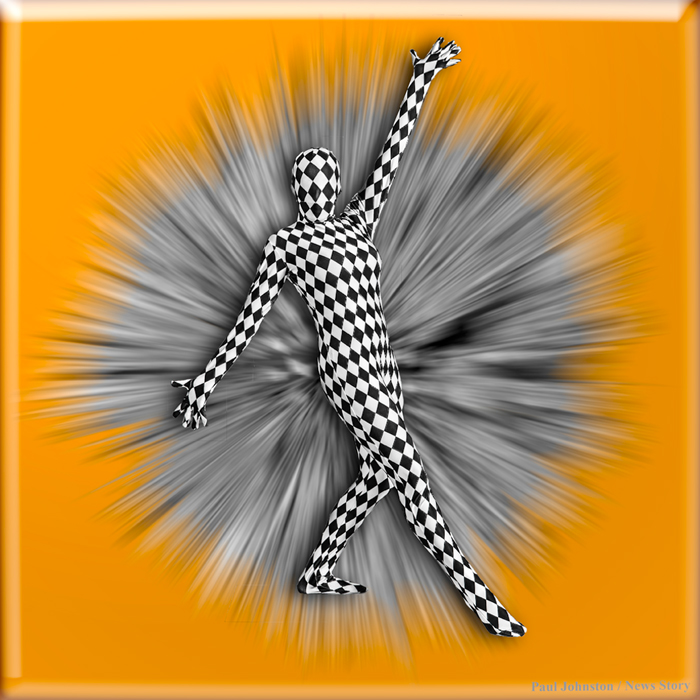
To create image at top of this page, three key elements are required : 1. Subject 2. Explosion layer 3. Background layer.
These three element can be created any way you want. The key is for the subject and explosion to have a transparent background and then stacked on top of the background layer. The backgound is the lower layer with the explosion layer placed on top of the background. The subject layer is placed on top of the explosion layer. These are the steps used to create this image. You could create something similar in any manner you wished. Just be sure you create the subject and middle layer on a transparent background and then place them above your background layer. All of the work was done within one file. Layers were added or deleted as necessary. Layer visibility was turned on/off as necessary. Layers order was adjusted as necessary. The resulting file that contained all work, needed only 4 final visible layers (brightness/contrast adjustment layer, subject layer, explosion layer, colored background layer). The 4 needed visible layers plus all the creative non visible steps in between which resulted in a .PSD file size of 1.56 GB.
|
||
Original Image - Edited In Lightroom |
Subject Extracted From Original Image
|
Trial Explosion Creation |
Original RAW image was opened in Lightroom and basic editing done in the Development module to get image looking the way I wanted. Edited image was then edited in Photoshop as a .PSD file. I duplicated the background image three times and started working on various things needing to be accomplished - extracting subject, creating explosion and background. I duplicated the background image several times as I experimented and worked my way through the entire process. Visibility of various layers were turned on an off as needed as well as the order of various layers were adjusted to visualize the effect of my work. The original Lightroom edited image became the background layer which was duplicated three times. With one of the duplicated backgrounds I extracted the model from her background using the Quick Selection Tool. Once selected, I copied and pasted the model into a new layer. The results was the model on her own layer with a transparent background. The trial explosion was created by selecting the second duplicated background layer of the original edited image. At the top of the Photoshop screen, I went to 3D → New Mesh From Greyscale → sphere. This produced the trial explosion creation shown above. Note: The results you obtain using 3D → New Mesh From Greyscale → sphere will depend on the image used to create the explosion. This particular image made up mainly of black and white squared resulted in a sperical shaped explosion. From this results, it was seen that the left and right sides of the explosion were cut off and that the canvas size of the image would need to be enlarged so that the full explosion size could be seen.
|
||
Expanded Canvas Size To Make A Square |
Results Of Creating Revised Explosion On Expanded Canvas |
Results Of Cutting And Pasting Explosion On New Layer |
I deleted this trial explosion creation layer and then selected another background duplicate layer. From here I went to Image → Canvas Size. I noted which dimension on the document size was the longest and set the shorter dimension to match the longest dimension. Set the canvas extension color to white. Click OK. This made the canvas size a square. Once the canvas size of the image was made into a square, the expanded canvas layer with the subject was selected. Then, going to 3D → New Mesh From Greyscale → sphere, the revised explosion was created. From this layer, use the Lasso Tool and circle the explosion. Just circle the explosion, no need to be try to advoid the bacground material as it will not go into the new layer. Create a new layer and paste the explosion into it. It will look like the above image except it will be on a transparent background.
|
||
Results Of Applying A Radial Zoom Blur To Explosion |
To create a blurry spikey explosion, select the layer with the explosion just pasted into it. Now use Filter → Blur → Radial Blur → Amount = 100 → Blur Method = Zoom → Quality = Best → OK. The results of the blurry explosion is shown to the left on a transparent background. |
 |
 |
 |
Before creating the background layer, turn off the visibility of all layers. Now create a new layer to place the background layer on and turn on its visibility. Fill this new layer with any color. Now select Layer → Layer Styles → Blending Options → Styles. Look to the right half of the open panel and you will see a sampling of styles. If you do not see one you like then look to the right of the various style and find a small circle with this triangle, ►, in it. Click on ► and more selection will open up. There are different styles ranging from Abstract Styles to Web Styles. Click on one and Append it to the styles already displayed. Click on the various styles and look at the checked Preview window to see what it looks like. If you do not find what you like click on ► again and select more styles to be appended to your style preview and have a look at them. Once this background layer style is finally selected, the edited image is almost finished. IMPORTANT: For creating this background to work for this method, the newly created layer for this background must be filled in with any color. Once filled in with a color, then when you select the layer style, this will be placed over the initial color fill for this layer. |
REORGANIZE YOUR LAYERS: Move the extracted subject layer to the top layer. Move the expanded explosion layer just below the subject layer. Finally, move the colored background layer to the third layer below the explosion layer. Turn on the visibility of the subject, explosion and colored background. Turn off the visibility of all other layers. The visible layers now starts to resemble the finished image. |
 |
ADDING DROP SHADOW TO SUBJECT: Select the subject layer. To more easily see the drop shadow, temporarily turn off the visibility of the explosion layer. Click on add layer effects by selecting Now select Layer → Layer Styles → Blending Options → checking Drop Shadow and then clicking on the Drop Shadow Box. The Drop Shadow detail panel will open and you can adjust the setting to your taste. Settings used here: Blend Mode=Multiply; Color=Black; Opacity=75%; Angle=8; Check Use Global Light; Distance=55px; Spread=0; Size=131 px. What you see now is the subject with the drop shadow applied on the colored background. Now turn on the visibility of the colored background. |
LAST TWO STEPS: Create a new Brightness/Contrast adjustment top layer above the subject layer. Adjust contrast/brightness to taste. Save as whatever file type you wish. Will suggest you save one of your files as a .PSD file so that all your steps are preserved in case you want to go back and tweak the image or use this image as a guide for creating some other image that uses similar steps. |
Example Final Layer Panel - This is an approximation of how the final layers panel looked. When I created this image I did not create the image with the thought of writing steps on how it was done until someone asked me for the steps. The layers panel became a creative work in progress file. Some working steps were deleted. The final results is that only 4 visible layers are needed: brightness/contrast adjustment layer, subject layer with drop shadow, explosion layer, colored background layer. Shown above has Layer 2 being visible but it is not necessary to be visible to achieve the final results.
Good luck on your future creative processing!
|
Copyright - 2013 Paul Johnston
© Austin News Story


